
Stereolithography is 3D printing with light. A beam of UV light hardens liquid resin, one thin layer at a time, until a solid part rises out of the tank. It looks like a sci-fi movie. It smells less like one, so open a window.
The first 3D printing method
Chuck Hull invented stereolithography in the 1980s, patented it in 1986, and co-founded 3D Systems to sell it. That is also where the STL file format got its name: it was made to feed the first SLA machines.
How it works
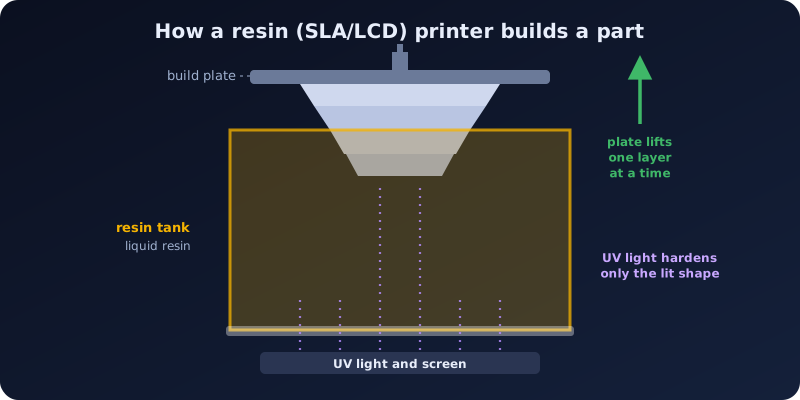
- A tank holds photopolymer resin, a liquid plastic that hardens when UV light hits it.
- The build plate lowers until it is one layer's thickness above the tank floor.
- UV light draws or projects the shape of that layer through the clear floor. The lit resin becomes solid and sticks to the plate.
- The plate lifts a little, fresh resin flows in underneath, and the next layer is cured.
- Repeat a few hundred or thousand times, then lift the finished part out.
Three common kinds of resin printer
| Kind | How it lights each layer |
|---|---|
| SLA (laser) | A laser traces the layer, point by point. |
| DLP | A projector flashes the whole layer at once. |
| MSLA / LCD | An LCD screen masks a UV panel to show the layer at once. Most hobby resin printers work this way. |
People often say "SLA" for all three. They share the same idea and the same workflow.
After the print
A resin part is not finished when it comes off the plate. It is sticky with uncured resin and needs:
- Washing in isopropyl alcohol or a resin-safe cleaner.
- Curing under UV light to reach full strength.
- Removing supports, the thin pillars that held it to the plate.
Uncured resin can irritate skin and has strong fumes. Wear nitrile gloves, work with good ventilation, and never pour leftover resin down a drain.
Resin versus filament printers
| Resin (SLA, DLP, LCD) | Filament (FDM) | |
|---|---|---|
| Fine detail | Excellent, with very smooth surfaces | Good, with visible layer lines |
| Size of part | Usually smaller | Often larger |
| Mess and cleanup | Washing, curing, gloves | Almost none |
| Strength | Often more brittle | Tough materials available |
| Best for | Miniatures, jewelry, fine art, detailed reliefs | Functional parts and larger items |
Printing a relief on a resin printer
An Embossify model has a flat back, which is easy on a filament printer. Resin printers usually do better with a part tilted on supports, because a large flat face pulls hard against the tank floor with every layer. Your slicer can tilt and support the model for you. Use the Resin, fine detail preset in the converter for a small, crisp print with a thin solid base, and keep the model modest in size so it fits your build plate.