
Everything you need to turn a picture into a 3D relief you can print or carve. Can't find your answer? Contact us and a real human will reply by email. New to 3D printing or CNC? Our Learn guides start from zero, no judgment.
Getting started
- Choose an imageClick the preview on the home page, or drag a picture onto it. A live 3D preview appears straight away, before anything is uploaded.
- Set the sizeEnter the width and depth you want in millimeters, or pick a preset.
- Press EMBOSSIFYWe build your STL file in a few seconds.
- Preview and downloadRotate the finished model in 3D to check it, then download the free file. A high resolution file is there if you want more detail.
You never sign up. Free pictures and the STL files made from them are deleted automatically after 3 days.
Image types that work
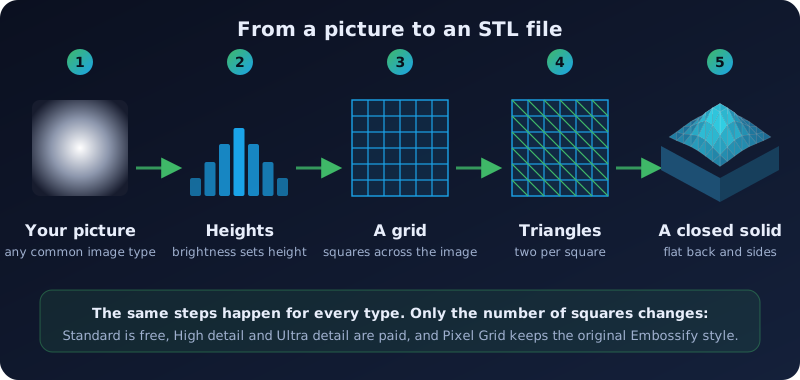
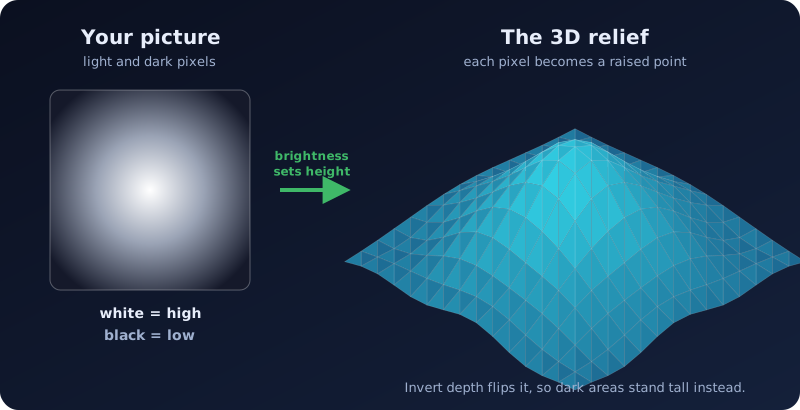
Embossify accepts all the popular image types, so you don't need to convert anything first. Whatever the type, each pixel's brightness becomes height, so a sharp, well-lit picture with good contrast matters more than the format.
RAW camera files (CR2, NEF, ARW, DNG and similar), PDF and multi-layer files such as PSD. Export the picture as a JPG or PNG first, or take a screenshot of it.
Limits: up to 20 MB per image and up to 60 megapixels. If your file is larger, shrink it in any photo editor first. Even a 3,000 pixel wide image has more detail than the free file uses.
Width, depth and invert
The very edge of every model is kept flat, so it makes a clean frame around the picture. The model is a solid, closed shape and is ready to slice or carve. More controls, such as base thickness, shapes, smoothing and picture adjustments, are under the Shape and Coins tabs and the Advanced button, which opens a panel of settings under the converter.
Embossment types: Standard, High detail, Ultra detail and Pixel Grid
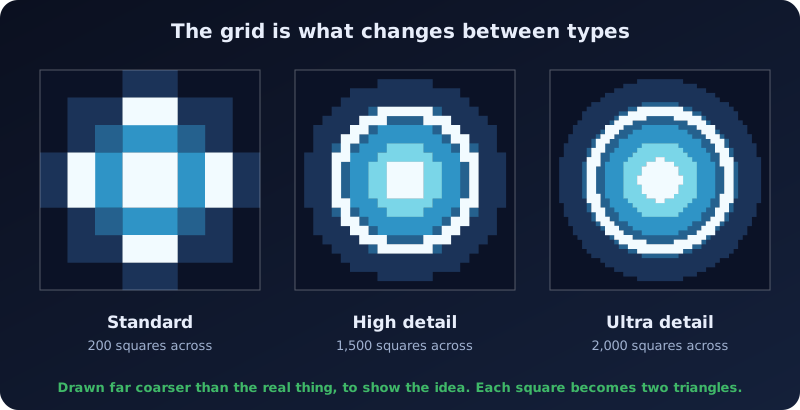
Your picture is cut into a grid of tiny squares, and every square becomes two triangles in the STL. The embossment type sets how that grid is made. A finer grid follows your picture more closely, but the file is bigger and slower to open. You choose the type after your free file is ready: the paid types are offered with their facet counts and file sizes, and you pick one before you pay.
| Type | Price | Grid | Typical file | Best for |
|---|---|---|---|---|
| Standard | Free | 200 squares across | about 3 MB | Trying things out, previews, small prints and quick tests. Opens instantly in any slicer. |
| High detail | Paid | 1,500 squares across | about 140 MB | Large prints, fine carving and detailed photos. |
| Ultra detail | Paid | 2,000 squares across | about 270 MB | Very large CNC pieces and very sharp artwork. Needs a powerful computer. |
| Pixel Grid | Paid | 1,500 squares across | about 140 MB | The original Embossify style. See below. |
Everything is converted for free first, so you always get the Standard file and can preview it in 3D. The paid types are offered after that, each with its price shown before you pay.
No. A 120 mm wide model at High detail has a square about 0.08 mm wide, which is already finer than most printers can print. More detail only helps if your picture really contains it, so a small or blurry image gains nothing from Ultra and just makes a bigger file. If your slicer or CAM program is slow or runs out of memory, choose a lower type.
What is Pixel Grid?
Pixel Grid builds the model the way Embossify always has. Each pixel of your picture becomes one square of the model, the brightness of the pixel sets its height, and big pictures are shrunk by picking one pixel per square. It also keeps the original flat border, which is 3 squares wide. High detail uses the same idea, but shrinks big pictures by averaging them, which gives a smoother, less grainy surface, and its border is a set size in millimeters. If you have ordered from Embossify before and want the same look again, choose Pixel Grid. For everything else, High detail is the better choice.
Pixel Grid files have the same surface as the originals, but every triangle now faces the right way and has a correct normal, so slicers and CAM programs open them without repair.
File formats: STL, 3MF, GLB, PLY and OBJ
The default download is an STL, the format almost every 3D printing and CNC program understands. Your files can also come as 3MF, GLB, PLY, OBJ and a heightmap PNG. They all describe exactly the same model, so choose the one your software prefers. If you are not sure, STL is always safe. For a longer, illustrated comparison see 3D file formats: STL, 3MF, GLB, PLY, OBJ and heightmaps. Files made with a volume code or through the API are STL only for now; contact us if you need the other formats in bulk.
| Format | Best for | Opens in | Size next to STL |
|---|---|---|---|
| STL Stereolithography | Anything. The safe choice, and the one CNC programs expect. | Every slicer, CAM program and 3D program | The reference |
| 3MF 3D Manufacturing Format | Modern 3D printing. It knows the size is in millimeters. | PrusaSlicer, Bambu Studio, Cura, Fusion, Windows 3D Builder | About a third |
| GLB Binary glTF (Graphics Library Transmission Format) | Web pages, augmented reality and rendering. | Blender and many web and AR viewers | A little smaller |
| PLY Polygon File Format | Scanning, research and mesh tools. | MeshLab, CloudCompare, Blender | About the same |
| OBJ Wavefront Object | Sharing with almost any program, Blender and game engines. | Blender, Maya, 3ds Max and many CAD programs | About twice as big |
| Heightmap PNG Portable Network Graphics, used as a heightmap | CNC programs that cut from a grayscale picture instead of a mesh. White is the top of the relief, black the bottom. 8-bit has 256 height steps, 16-bit has 65,536 for smoother cuts. | VCarve, Aspire, Carbide Create and other CNC software, Blender (displacement) | Much smaller |
For a modern slicer, 3MF is a good choice and a small download. Keep the STL for CNC software and older programs. Choose GLB if the model is going on a web page, PLY for MeshLab, and OBJ for Blender or a game engine. You can tick as many as you like at checkout.
Every extra format is made from your STL the first time you download it, so that first download can take a few seconds (longer for the very largest files). OBJ is plain text and gets very large, so it is not offered above 3 million facets. A heightmap PNG is a picture, so it cannot hold the depth: enter the width and relief depth shown for your model in your CNC software (the file also records them in its notes). The price of each extra format, if there is one, is shown at checkout. The free Embossify Lens opens STL, 3MF, GLB, PLY and OBJ files, so you can look at any of them before you print.
Embossify Studio
Embossify Studio is a wide page that gives the live preview the left side of your screen and every setting the right side, so you can adjust things and watch the model change. Press the Studio badge on the preview, or open embossify.com/studio directly. Your picture and settings come with you. Use the Convert link in the menu to go back to the home page. It is best on a computer or a tablet.
Getting the best results
3D printing, lithophanes and CNC
The download is a standard binary STL file, in millimeters. Almost every slicer and CAM program can open it.
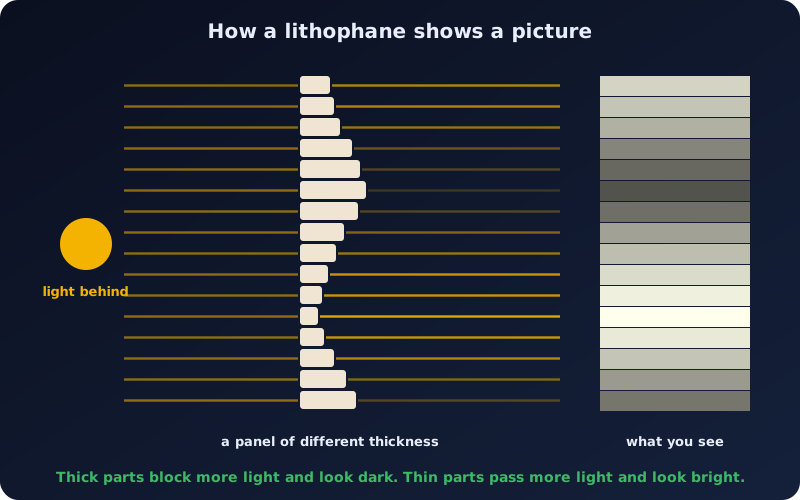
Want more background? Read the guides on STL files, lithophanes and CNC routing.
Paid files, codes and orders
The free Standard file is always free. A paid file keeps much more of your image's detail, and is the one to choose for large prints or fine carving.
Download links stay valid for 3 days after you pay. Your payment is handled by PayPal and we never see your card details.
Pricing explained
This section always shows the live prices, so it matches what you see at checkout. Not sure what you need? Convert your picture first: the Standard file is free, and every price is shown before you pay.
Everything starts free. You always get the SD (Standard resolution) STL for nothing. A finer HD (High resolution) file costs $5.00 and includes the STL. Other file formats are $3.00 each, or $10.00 for all of them. A ULTRA copy, finer still, is an add-on of $3.00 per file, and you get it in addition to the HD file. Prices are in USD and shown before you pay.
What each part costs
| File | SD Standard | HD High resolution | ULTRA copy |
|---|---|---|---|
| STL | Free | Included in the $5.00 | + $3.00 |
| 3MF | Free | + $3.00 | + $3.00 |
| GLB | Free | + $3.00 | + $3.00 |
| PLY | Free | + $3.00 | + $3.00 |
| OBJ | Free | + $3.00 | + $3.00 |
| Heightmap PNGs (8-bit and 16-bit together) | Not offered | + $3.00 | + $3.00 |
| Every format together | + $10.00 more for all of them | Just $3.00 more per format |
All formats of a file are made from the same model, so they always match. A format that would be too large for a very detailed file is not offered for it: OBJ up to 3.0 million facets, other formats up to 9.0 million. When that happens the free SD version of that format is offered instead, and the every-format price is reduced in proportion.
Examples
- HD STL only: $5.00
- HD STL + 3MF: $8.00
- HD STL + every format: $15.00
- HD STL + ULTRA STL: $8.00 (you get both files)
- HD STL + 3MF, plus an ULTRA copy of each: $14.00
- Everything: every format in HD and an ULTRA copy of each (6 files): $33.00, where the file is small enough for each format
How ULTRA works
- Ultra is a finer grid, with about a third more detail than HD. It is an add-on, never a replacement: you receive your HD file and the ULTRA file next to it, listed separately on your order page and in the ZIP.
- Each file has its own Ultra tick at checkout (the STL, and each format you pick). Every tick is $3.00, whatever the format.
- The every-format price covers the HD files only. Ultra is always extra, because an Ultra file is much bigger and takes longer to build.
- Ultra is not shown at checkout when it cannot help: a picture too small to gain from a finer grid, a format whose Ultra file would be too large, the Pixel Grid style, and orders paid with a volume code.
Pixel Grid
Pixel Grid is the original Embossify look, one flat square per pixel with a flat border. It is chosen in a separate tab at checkout and costs $5.00 in place of the smooth HD file. The look carries into 3MF, GLB, PLY and OBJ. The heightmap PNGs use the same one-pixel-per-square picking but, being plain pictures, have no border. There is no Ultra copy of a Pixel Grid file.
Volume codes
A volume code buys many files at once, so each costs less. One use of a code is one HD file (smooth or Pixel Grid) in any format, with no extra to pay for formats. Codes do not cover ULTRA copies, and promo codes do not apply to packs.
| Pack | HD files | Price | Per file |
|---|---|---|---|
| 5 HD files | 5 | $22.50 | $4.50 |
| 10 HD files | 10 | $40.00 | $4.00 |
| 50 HD files | 50 | $175.00 | $3.50 |
| 100 HD files | 100 | $250.00 | $2.50 |
| 500 HD files | 500 | $750.00 | $1.50 |
| 1,000 HD files | 1,000 | $1,000.00 | $1.00 |
| 2,500 HD files | 2,500 | $1,875.00 | $0.75 |
| 5,000 HD files | 5,000 | $3,000.00 | $0.60 |
| 10,000 HD files | 10,000 | $5,000.00 | $0.50 |
The API
The API is paid with volume codes, so its price is the volume price: from $0.50 per file in the biggest pack. One successful embossment uses one use of your code, and it is one HD file.
- Any format of the same file (3MF, GLB, PLY, OBJ, heightmaps) can be downloaded with
format=at no extra use. - Quality is High (the default) or Pixel Grid. ULTRA is not available through the API, and promo codes do not apply.
- Failures are not charged. If our build fails, the use is credited back to your code automatically; if a file arrives broken, contact us within 30 days with the bid and we credit it by hand. A file built correctly from your parameters is not credited. Details on the API page.
- You can see what a code has left on the balance page.
Terra terrain models
The free SD Terra model costs nothing. A HD Terra model is $5.00 and includes the STL. Other formats cost the same as in the table above. There is no Ultra for Terra, and sales and promo codes do not apply to it.
Sales, promo codes and payment
If you have a promo code, enter it under Have a promo code? at checkout (single files only; never volume packs or Terra). Only the better of a sale and a promo code applies. You pay with PayPal (a card in many countries) and we never see your card details. Download links work for 3 days after you pay; if you lose one, use Find my order. Something wrong with a file? Tell us with your order number.
Troubleshooting
"That file is not a supported image"
The file isn't one of the types listed above, or it is damaged. Check it opens normally on your computer, or re-save it as a PNG or JPG. Renaming a file's extension doesn't change what it is. Calling a cat a dog does not make it bark.
My model looks flat
The picture probably has low contrast. Increase the contrast, or try a larger relief height. If your subject is dark on a light background and you want it raised, turn on Invert depth.
My model is upside down or the wrong way round
Use Invert depth to swap high and low, or the Mirror, Flip and Rotate buttons under Advanced. Photos from phones are turned the right way up automatically.
The download didn't start
Press the download button again. If you still have trouble, try another browser, and check that your browser isn't blocking downloads from this site.
I didn't get my email
Check your spam or junk folder first, and make sure emails from Embossify aren't being filtered. You never depend on the email: use Find my order to have your order links emailed to you again. If that doesn't work, contact us with your email address and we'll sort it out.
"You have reached the hourly conversion limit"
To keep the free service fast for everyone, there is a limit on how many images one visitor can convert per hour. Wait a while and try again. Go stretch, get a snack, come back.
The file is too large to upload
Images over 20 MB or 60 megapixels are rejected. Resize the image in any photo editor. The result won't lose any useful detail. Your printer cannot see 60 megapixels anyway.
Your images and privacy
- Your image is processed on our server only to build your model. The live preview on the home page runs in your own browser.
- Free pictures and the STL files made from them are deleted automatically after 3 days. Your paid download link works for 3 days, and the picture behind it is deleted then too.
- For the full details, read our Privacy Policy and Terms of Service.
Still need help?
Tell us what you were trying to do and what happened, and include your order number if you have one. We promise not to say "have you tried turning it off and on again" (unless it helps).